
Learn simple homemade dog treats, smart ingredient tips, and discover 5 top-rated products to create tasty DIY dog snacks at home.
Homemade Dog Treats: Healthy and Easy Recipes Your Dog Will Love
There’s nothing quite like the joy of watching your dog gobble up a treat you made with love. Homemade dog treats are becoming a popular trend among pet parents – and for good reason! Not only can you control the ingredients and ensure they’re healthy, but you can also save some money in the long run. (In fact, pet owners in the U.S. spent over $68 billion on pet food and treats in 2024 – a huge market that shows how important treats are in our dogs’ lives.)
By making treats at home, you know exactly what’s in them and can avoid artificial additives. It’s also a fun kitchen project that the whole family (kids included!) can enjoy together. This guide will walk you through the benefits of homemade dog treats, some easy dogs treat recipes, helpful tips (with safety precautions), and even recommend a few awesome products to help you become a DIY dog-treat chef. Let’s get those tails wagging and ovens preheated!
Why Make Homemade Dog Treats?
Making dog treats at home isn’t just about feeling like Martha Stewart for pets – it actually has real benefits for you and your pup. Here are a few reasons why homemade dog treats are pawsome:
Healthier Ingredients
When you make your own treats, you’re in charge of the ingredients. This means you can use fresh, wholesome items and skip the unhealthy stuff. Many store-bought treats contain preservatives, excess salt, or fillers. At home, you can choose dog-friendly, natural ingredients like pumpkin, peanut butter, oats, or sweet potatoes. For example, pure pumpkin puree is a favorite add-in – dogs love the taste, and it can even help with digestion due to its fiber content. You won’t be adding any mystery chemicals or too much sugar. It’s truly farm-to-dog-bowl quality!
Customize for Your Dog
Every dog is unique. With homemade treats, you can customize recipes to suit your dog’s dietary needs or preferences. If your dog has grain allergies, you can use grain-free flour (like rice or oat flour). If your pup needs to lose a little weight, you can bake low-fat treats with lean ingredients. Got a dog that’s crazy about banana or pumpkin? You can incorporate those favorite flavors. You can also make treats softer for older dogs with sensitive teeth, or extra crunchy for heavy chewers. It’s all up to you.
No Artificial Preservatives
Homemade treats have no artificial preservatives or weird chemicals. You’ll make smaller batches that can be used up while fresh. This is much better for your dog’s health. Just remember that because they lack preservatives, homemade treats don’t last as long on the shelf – but we’ll give tips on storing them (and trust us, your dog will probably eat them up before they ever could spoil!).
Cost-Effective & Fun
Believe it or not, making treats can save money. A fancy bag of organic dog biscuits from the pet store can be expensive. The basic ingredients for homemade dog treats (like flour, eggs, peanut butter, etc.) are often things you already have or can get cheaply. By making large batches and storing or freezing extras, you get more treats for your buck. Plus, the process itself is fun and rewarding – it’s a great activity to do with family or friends. You can even get creative with shapes and colors.
Bonding and Training
Using treats you made yourself can be a wonderful bonding experience with your dog. Dogs seem to know when something is made just for them – you might notice extra excitement when those homemade goodies come out! They’re perfect for training sessions too. In fact, our guide on dog-friendly hiking trips reminds pet owners to pack treats as a reward on long walks and adventures. Having a stash of homemade treats means you’ll always be ready with a special reward during training or outdoor fun. Just be sure to break them into small pieces for training so you don’t overdo the calories.
Tip: Even when treats are healthy, moderation is key. Veterinarians often recommend the “10% rule” – treats (homemade or store-bought) should make up no more than 10% of your dog’s daily calorie. This ensures your pup doesn’t fill up on snacks and miss out on balanced nutrition from regular meals. So, enjoy those homemade goodies, but don’t let your dog guilt you into too many!
Easy and Healthy Dog Treat Recipes to Try
One of the best parts of making treats is that it can be really simple. You don’t need to be a pro baker. In this section, we’ll share a few easy dog treat recipes that use minimal, wholesome ingredients. These recipes are simple enough that a 7th grader could make them (with adult supervision for the oven). Remember, whenever you follow a homemade dog treats recipe, always use dog-safe ingredients and avoid anything toxic (we’ll cover ingredient cautions in the next section). Let’s get cooking!
Homemade Dog Treats Recipe: Peanut Butter & Pumpkin Biscuits
This healthy dog treats recipe is a classic – it combines two dog-favorite flavors (peanut butter and pumpkin) into a yummy biscuit. It’s totally grain-free optional and packed with nutrients. Here’s how to make it:
- Ingredients: 2 cups of whole wheat flour (or rice flour if your dog is sensitive to wheat), 1 cup of pure pumpkin puree (canned pumpkin with no added sugar – not pumpkin pie mix), 1/2 cup of natural peanut butter (make sure it does NOT contain xylitol, an artificial sweetener that is extremely toxic to dogs), and 2 eggs. You can also add a teaspoon of ground cinnamon for flavor (cinnamon is safe for dogs in small amounts and can make the treats smell great).
- Directions: Preheat your oven to 350°F (175°C). In a mixing bowl, stir together the pumpkin puree, peanut butter, and eggs until well combined. Gradually add in the flour and mix until it forms a dough. If the dough is too sticky, add a little more flour; if it’s too dry, you can splash a tablespoon of water. Roll out the dough on a floured surface to about 1/4-inch thickness. Now the fun part: use a cookie cutter to cut into shapes.
- (Dog bone or paw-shaped cookie cutters are perfect for this – we’ll mention a product for that later!) Place the cut-out dough pieces on a baking sheet lined with parchment paper. Also, bake for about 15–20 minutes, or until the treats are lightly golden and firm. Let them cool completely before serving. Your kitchen will smell amazing, and your pup will likely be hovering, drooling in anticipation!
- Why It’s Healthy: These biscuits contain pumpkin, which is high in fiber and vitamin A (great for digestion and immune support), and peanut butter, which provides protein and healthy fats. There’s no added sugar or salt. It’s a simple, wholesome treat. (Just remember, because these have no preservatives, you’ll want to store them properly – more on that soon.)
Tip: If you want to make this recipe grain-free, you can swap the wheat flour for oat flour, almond flour, or a mix of coconut flour and a little extra egg (since coconut flour absorbs a lot of moisture). The texture might come out a bit different, but it will still be a tasty, healthy dog treat.
Easy Frozen Banana Yogurt Treats (No-Bake)
Not all treats have to be baked! If you’re looking for something super quick that’s great for warmer days, try these frozen treats. They only need 3 ingredients and no oven at all – just a freezer.
- Ingredients: 2 ripe bananas, 1 cup of plain yogurt (unsweetened, preferably low-fat plain Greek yogurt works well because it’s thick – make sure it has no artificial sweeteners), and about 1/4 cup of natural peanut butter (again, xylitol-free and ideally unsalted). You can also splash in a little water or unsalted chicken broth if you need to thin the mixture for pouring.
- Directions: In a blender or food processor, blend the bananas, yogurt, and peanut butter until you get a smooth consistency. (If you don’t have a blender, you can mash the bananas by hand and whisk in the yogurt and peanut butter – it’ll just have some fruity chunks, which is fine!). Now, pour or spoon this mixture into silicone molds or ice cube trays. For a fun touch, use a mold that makes small paw or bone shapes. Freeze the trays for a few hours until the treats are solid. Once frozen, pop the treats out and store them in an airtight container or freezer bag in the freezer. Whenever your dog deserves a refreshing goodie, just grab one – they’re like “pupsicles”!
- Why It’s Healthy: These cool treats are basically just fruit, yogurt, and peanut butter. Bananas provide potassium and fiber, yogurt offers calcium and probiotics (good for gut health), and peanut butter adds protein. It’s a nice treat for hydration on a hot day and can also be soothing if your dog’s teeth are teething or gums are sore (great for puppies). Plus, the cold texture is a fun change for dogs. Just don’t feed straight from the freezer if your dog wolfs things down without chewing – you might let it soften a minute if needed.
Tip: You can get creative and substitute other dog-safe fruits or veggies for the banana. For example, try pureed watermelon or blueberries. Just make sure anything you use is safe for dogs. NEVER use grapes for dogs (fresh or raisins) – those are very toxic and can lead to kidney damage. Always double-check a food if you’re not sure it’s dog-friendly!
Applesauce Oatmeal Treats (Easy Bake)
Here’s another simple homemade dog treats recipe idea, especially good if your pup is sensitive to dairy or just wants something different. These applesauce oatmeal cookies are dairy-free, egg-free, and super simple.
- Ingredients: 2 cups of oats (rolled oats or quick oats both work), 1 cup of unsweetened applesauce, and 1/2 cup of oat flour (you can make oat flour by grinding oats in a blender). Optional: a tablespoon of honey for a little extra sweetness (honey is safe in small amounts for adult dogs over 1 year old) and a pinch of cinnamon. If the mix is too dry, a splash of water or unsweetened almond milk can help.
- Directions: Preheat your oven to 350°F. In a bowl, mix together the oats, applesauce, and oat flour. The mixture will be sticky and thick, not like a typical dough – more like a thick batter. If it’s extremely thick, you can add a bit more applesauce or water. Scoop spoonfuls of the mixture and drop onto a greased or parchment-lined baking sheet, then flatten each a bit with the back of the spoon (to make cookie shapes). Bake for about 12–15 minutes. These won’t expand much, so you can place them relatively close. Bake until they firm up and are slightly golden. Let them cool. They will be a little chewy from the oats – which dogs often love.
- Why It’s Healthy: Only three main ingredients: oats (which are a good source of fiber and are generally gentle on the tummy), applesauce (provides vitamins and a touch of natural sweetness – apples are high in vitamins A and C and fiber), and a bit of honey if you included it (honey has natural antioxidants and can even help with dogs’ seasonal allergies in small doses). There’s no butter, oil, or dairy, and no wheat or corn, so this is a nice hypoallergenic option for many dogs. It’s also lower in fat and sugar than a lot of store treats.
These are just a few examples of easy recipes. There are endless dog treat recipes out there – from three-ingredient pumpkin cookies to more elaborate “pupcakes.” Feel free to experiment with dog-safe ingredients your pet likes. Peanut butter, pumpkin, banana, sweet potato, blueberries, carrots, and plain yogurt are all fantastic bases to start with. Just always avoid ingredients that could harm your dog, which brings us to…
Tips and Precautions for Making Homemade Dog Treats
Making treats is fun, but we have to keep our fur babies’ safety in mind. Before you start mixing up dough or blending fruit, keep these important tips and precautions in mind:
1. Know Which Ingredients Are Safe (and Which Are Not): Not everything we humans eat is safe for dogs. In fact, some common pantry items are toxic to dogs and should never be included in dog treats. For example, chocolate is a big no-no (it contains theobromine and caffeine that can cause serious illness in dogs). Grapes and raisins can cause kidney failure in some dogs, so absolutely avoid those. Onions and garlic (even powder form) can damage dogs’ red blood cells and cause anemia – skip those, and don’t use broths that might contain onion either.
Macadamia nuts are another hazardous food; they can lead to tremors and weakness in dogs. And as mentioned earlier, xylitol (an artificial sweetener found in some sugar-free peanut butters, candies, or gum) is extremely poisonous – even a small amount can be deadly. Always check peanut butter labels for xylitol (sometimes listed as “sugar alcohol” or “birch sugar”). When in doubt about an ingredient, do a quick search from a trusted source or ask your vet. It’s better to be safe! A good rule of thumb is to stick to simple, dog-friendly whole foods: meats, vegetables, fruits (that are safe), and grains.
2. Introduce New Treats Gradually: If your dog has never had the ingredients you’re using (say, pumpkin or banana or a new type of flour), introduce the new treats in small quantities first. Even safe foods can sometimes disagree with an individual dog’s tummy. Give one small treat and watch for any digestive upset. Most dogs handle these recipes well, but it’s wise to be gradual, especially if your pet has a sensitive stomach. If your dog is on a special diet or has medical conditions (like diabetes or kidney issues), always check with your veterinarian before introducing homemade treats. They might have specific ingredient recommendations or portion guidance for your dog.
3. Mind the Calories: As yummy as homemade treats are, remember they still add to your dog’s daily calorie intake. Keep treats small in size, especially if you’re treating often (for training, for example). You can make larger biscuits for big dogs and tiny bite-size nuggets for small dogs or for training rewards. A good practice is to account for treat calories by slightly reducing your dog’s regular meal portion on days you’ve given a lot of treats.
Obesity is a common issue in pets, and even healthy treats can contribute to weight gain if overused. Keep an eye on your pup’s weight and adjust treat giving accordingly. A fit dog is a healthy dog – our dogs rely on us to keep them at a healthy weight! (For instance, we mention in our American Bulldog care guide that a balanced diet and not overindulging in treats is key to preventing obesity in prone breeds.)
4. Store Treats Properly: Unlike store-bought biscuits that often-last months (thanks to preservatives), homemade dog treats have a shorter shelf life. To avoid mold or spoilage, you need to store them correctly. Completely cool all baked treats before storing (trapping any warmth can create moisture and mold). Store baked treats in an airtight container – a jar or sealed bag – and keep it in a cool, dry place. Soft, moist treats (or any that contain meat or cheese) should be stored in the refrigerator. In general, hard, dry treats (like biscuits) can last about a week at room temperature, or up to two weeks in the fridge.
Softer treats (or ones with meat) might only last a few days in the fridge. If you make a big batch, freezing is a fantastic option: you can freeze treats in zipper bags for a few months and thaw small portions as needed. Frozen treats (like the banana yogurt bites) should stay in the freezer until your dog eats them. Always check for signs of spoilage before giving a stored treat – if you see mold, an off smell, or a change in texture (too soft or too hard), toss the treats out and make a fresh batch. It’s better to be safe than sorry.
Storing homemade dog biscuits in an airtight jar keeps them fresh longer. Always let treats cool completely before sealing them up!
5. Keep Treats Small and Watch Portions: When cutting or shaping treats, aim for small sizes, especially if you have a small dog. It’s easy to overfeed if treats are large. Remember, you can always give a second little treat if your dog was extra good, but you can’t “ungive” a treat if it was too big! For training purposes, tiny treats or broken pieces are enough to reward your dog – they don’t mind the size as long as they get that yummy taste. Using small treats will stretch your batch further and keep calorie intake lower.
6. Use Treats to Complement (Not Replace) a Balanced Diet: Homemade treats are snacks or rewards, not a meal replacement. They don’t contain all the nutrients a dog needs in the right balance – so ensure your pup is still eating their regular high-quality dog food for their main diet. Think of treats as the canine equivalent of cookies or chips for us: fun and tasty, but not a substitute for dinner! Keeping this perspective will help you use treats wisely.
7. Have a Backup Plan: Sometimes life gets busy and you might not have time to bake or blend treats. It’s totally okay to have store-bought healthy treats on hand as a backup. Look for natural ingredient treats with no preservatives or a short ingredient list. You can also give simple human foods as treats occasionally, like plain carrot sticks, apple slices (no seeds), cucumber slices, or blueberries. These make quick, healthy treats too and can save the day if you run out of homemade goodies.
By following these tips and precautions, you’ll ensure your homemade treats are not only delicious but also safe and beneficial for your pup. Now that you’re armed with knowledge and recipes, let’s look at some cool tools and products that can make your homemade treat adventure even easier and more fun!
5 Best Products to Make Homemade Dog Treats (Reviews)
Ready to take your dog-treat-making game to the next level? Having the right tools and supplies can make baking for your dog a breeze. We’ve rounded up 5 top-rated Amazon products that dog owners love to use for DIY treats. In addition, these items will help you create professional-looking treats and might even inspire you to try new recipes. From a highly rated cookbook to cute cookie cutters, we’ve got you covered. Let’s check out the must-haves for any homemade dog treat enthusiast:
1. “The Ultimate Dog Treat Cookbook: Homemade Goodies for Man’s Best Friend”
If you’re excited about making treats and want lots of ideas, this dog treat cookbook is a perfect companion. The Ultimate Dog Treat Cookbook (by author Dorothy Moore) is a popular book packed with over 50 recipes for all kinds of treats – biscuits, training treats, even birthday “cakes” for dogs.
It’s written in a very approachable way, with simple instructions and ingredients you can find at the grocery store. The recipes have been vetted by thousands of dog owners, and the book has excellent reviews (around 4.5 out of 5 stars on Amazon). Many readers love that it includes vet-approved recipes and even notes on which treats are good for dogs with certain dietary needs (like low-fat options, wheat-free recipes, etc.).
Why you’ll love it: It’s like having a doggy bakery handbook. If you ever get bored of the basic recipes or want to try something special for the holidays, this book has you covered – think peanut butter bones, pumpkin pretzels, cheesy training bites, and more. It even has tips on ingredient substitutions and storage. A cookbook like this can keep you inspired and your pup’s treat jar full of variety! Plus, it’s a physical item you can flip through and maybe even let your kids pick a recipe from (great family activity). Pair this book with the tools below, and you’ll be a master pet baker in no time.
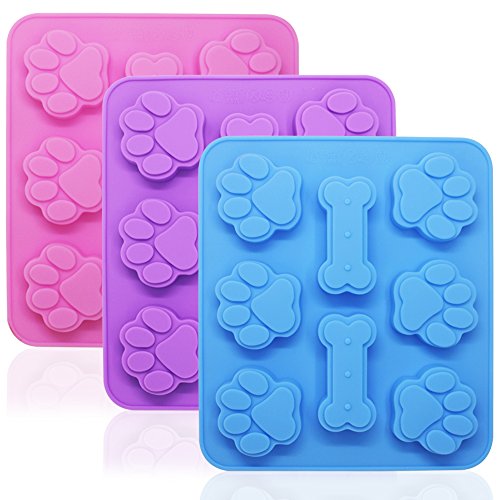
2. Puppy Paw & Bone Shaped Silicone Treat Molds (Set of 4)
Want your homemade treats to look as cute as the store-bought ones? Silicone molds are the secret. This set of paw and bone shaped molds is a best-seller for dog treat makers. You get four reusable silicone trays that have cavities shaped like small dog paws and bones. They are made from food-grade, non-stick silicone, which means it’s super easy to pop out your treats once they set or bake, and cleaning is a snap (they’re even dishwasher safe). Each mold can make dozens of treats in one go – perfect for small training treats or bite-sized snacks.

- PREMIUM QUALITY – Chocolate Molds is made of high-quality food grade silicone which is BPA Free, Safe to use in Oven, Mi…
- MULTI-FUNCTIONAL USE – Silicone Molds can be used for making Chocolate, Candy, Pudding, Jelly, Ice Cube, Biscuits etc. T…
- PERFECT SIZE AND EASY TO USED – Candy Molds include 3 pack bone molds with 18 cavities each, 3 pack paw molds with 10 ca…

- Puppy dog paw and bone silicone mold , the surface is smooth and does not stick to your hands, you can take out the whol…
- applicable occasions:It can be used repeatedly in microwave ovens, ovens, refrigerators and dishwashers
- The paw bone molds are safe used in oven, microwave oven, freezer and dishwasher. Temperature safe from-40 to +446 degre…
- HIGH QUALITY: Made of premium food grade silicone.
- MULTIFUNCTIONAL: You can use these molds to make ice, cookies, candies, chocolate, soaps, cakes, bread, jelly, pudding e…
- SAFE TO USE: These molds are safe used in oven, microwave oven, freezer and dishwasher. Temperature safe from-40 to +446…
How to use them: These molds are incredibly versatile. You can bake dough directly in them (they’re oven-safe, typically up to ~446°F/230°C). For example, instead of rolling dough and using cookie cutters, you could press your peanut butter pumpkin dough into the paw print cavities for a fun shape and then bake. You can also use them for no-bake frozen treats – pour in your yogurt/banana mix or even just frozen broth to make mini pupsicles. Since they’re non-stick, the treats will release without a fuss. Each tray usually holds 10-20 treats depending on mold size, so with a set of 4, you can prep a lot at once.
Why you’ll love them: They make your treats look professional and adorable. If you’re giving treats as gifts to other dog parents, a paw-shaped treat is sure to impress. Dogs obviously don’t care about the shape, but we humans have fun with it! Also, silicone molds mean uniform treat sizes, which is good for consistent baking and calorie control. This particular set has hundreds of positive reviews, citing durability and cuteness. And when you’re not using them for dog treats, you could even use the molds for human goodies like chocolates or gummies (just wash thoroughly in between). Overall, a must-have for any DIY dog baker’s kitchen.
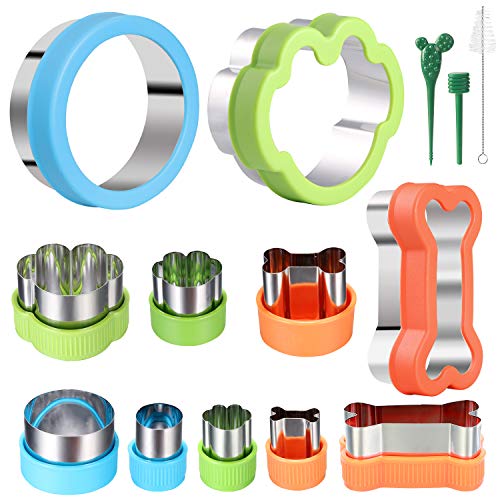
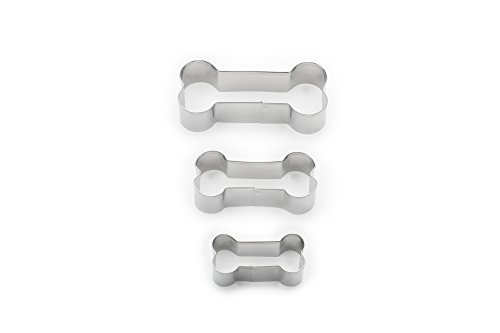
3. Dog Bone Cookie Cutter Set (Stainless Steel, Various Sizes)
If you prefer the traditional route of rolling out dough and cutting shapes, you’ll need a good dog bone cookie cutter set. There are many out there, but look for a set of stainless steel cutters in multiple sizes. A popular set on Amazon comes with 5 different bone-shaped cutters ranging from a small 2-inch size up to a big 5-inch bone. This is great because you can make tiny training treats or larger biscuits for bigger dogs – all with the classic bone outline.
- Package: a large, a medium, a small and a mini orange dog bone, green dog paw molds. a large, a medium and a small blue …
- Material: Stainless steel and plastic. Durable and no rust, and can be used repeatedly. The plastic cover is safe and pr…
- Application: Perfect for cutting out cookies, cakes, sandwiches, vegetable and fruit into dog bone shape, dog paw molds …

- Manufactured with certified food safe steel and can be used repeatedly. All cutters have a dismountable PP plastic cover…
- there are 3 piece dog bone biscuit cutter set.3 different Sizes of food cutters for your homemade dog cookie treats.
- The multiple sizes make the process easy for making multiple sizes of dog treats for different dogs. also,the cutters ca…
- SLEEK STAINLESS STEEL DESIGN ensures that these dog bone cookie cutters will hold up against all your baking needs.
- VERSATILE FUNCTION: In addition to cutting biscuits, try using these bone dough cutters to make scones, pastries, and mo…
- STURDY CONSTRUCTION makes these dog bone cookie cutters sure to keep up, so they’re ready to go when you are. Just make …
Features: The stainless steel means they’re sturdy and can cut through thick dough (and they won’t rust if you dry them properly after washing). Many sets have rolled edges on one side, which makes them easier on your hands when pressing down. Using these is straightforward: roll your prepared treat dough on a floured surface and press the cutter to make as many bone shapes as you can. Gather scraps, re-roll and cut again until you use up the dough. You’ll end up with a bunch of cute bone biscuits ready to bake. The uniform thickness and shape help them bake evenly too.
Why you’ll love them: It’s so satisfying to see real dog-bone-shaped treats come out of your oven! It instantly makes them look like “real” dog biscuits you’d buy at a boutique. If you have multiple dogs or friends’ dogs of different sizes, you can tailor the treat size by using the appropriate cutter. These cutters can also be used for other things like cutting fondant (if you ever get fancy with dog-safe icing) or even kids’ playdough for fun. They basically last forever and don’t take up much space – just store them nested together. With a good set of bone cookie cutters, every batch of dough can turn into an Instagram-worthy pile of biscuits.
4. Dash Mini Dog Treat Maker (Electric Baking Appliance)
If you’re looking for convenience, the Dash Dog Treat Maker is a gadget that many pet parents swear by. Dash is known for its mini waffle makers and kitchen appliances, and they’ve created a compact electric dog treat maker that works like a little waffle iron, but for dog biscuits! It’s a small countertop appliance (about the size of a sandwich press) that has molds for bone-shaped treats built into it. You plug it in, pour or place your batter/dough, and it bakes the treats in minutes – no need to turn on your big oven at all.

- UNPROCESS YOUR TREATS: Make delicious, homemade dog treats with natural ingredients from your own kitchen.
- 6 BONES AT A TIME: Makes up to 6 bone-shaped dog treats at a time.
- QUICK Plus EASY: Simply plug it in, add batter, and cook: you’ll have 6 drool-worthy dog treats in no time.

- 【Food-grade Silicone】Dog Treat Molds Silicone is Healthy, Durable and Non-Stick.
- 【Temperature Resistant】From -40° F to +446° F, Silicone Dog Treat Mold Can Be Use in Oven,Freezer,Dishwasher,Micro-Wave.
- 【108 Cavities】Dog Treat Molds Have a Nice Size, Dimension of Tiny Dog Bone Cavity: 0.98″ X 0.49″ X 0.24″
How it works: The Dash treat maker usually makes about 6 to 8 bone-shaped treats at a time (depending on the model). It comes with a recipe booklet too. You preheat the machine (it heats up quickly), then spoon in your batter or dough into the bone-shaped wells, close the lid, and wait about 5-7 minutes. Boom – freshly baked dog treats pop out, nicely browned and evenly cooked on both sides. Because it’s non-stick, the treats release easily and clean-up is just a quick wipe when it cools. You can experiment with many recipes in it – from typical biscuit dough to even making “pup waffles” with dog-safe ingredients.
Pros: This device is fast and easy. If you want to make a quick batch of treats without preheating an oven (especially in summer, to keep the kitchen cool), it’s super handy. Reviewers love that it’s fun to use, and the included recipes are simple. It’s also kid-friendly to operate (with supervision, as it does get hot). The size of the bones it makes is usually medium – great for most dogs, and you can break them for smaller dogs. It’s worth noting that each batch is small (6-8 treats), so if you want a ton of treats you’ll do multiple batches, but since each is under 10 minutes, it’s still fairly quick.
Why you’ll love it: Think of it as an easy-bake oven for dog treats! Many owners say their dogs prefer the texture of the treats from this machine – they come out a bit softer, like a cross between a biscuit and a muffin, which dogs find very palatable. If you’re short on time or not super confident with baking, this gadget ensures you get great results with minimal effort. And it’s adorable to boot (often they come in cute colors). This could also be a fantastic gift for a dog lover in your life who might enjoy making treats.
5. Homemade Dog Treat Baking Mix (Cooper’s Treats Starter Kit)
For those days when you want homemade treats without measuring and mixing from scratch, a dog treat baking mix can be a lifesaver. Cooper’s Treats is a popular brand that offers a Baked Biscuit Starter Kit – basically a ready-to-go mix for dog cookies. Think of it like a cake mix, but for dog treats. The kit typically includes a bag of pre-mixed dry ingredients and often a bone-shaped cookie cutter as a bonus. All you usually need to add is water (and sometimes a tablespoon of oil or an egg, depending on the mix).

- Celebrate Your Dog’s Special Moments – Used by loving pet owners who are interested in natural, additive-free pet produc…
- Deliciously Easy DIY Dog Treats – Quickly bake fresh treats using basic kitchen ingredients like water, oil, and an egg …
- Wholesome, Dog-Friendly Ingredients Made in USA – Each baking mix is wheat-free, gluten-free, and soy-free, featuring re…
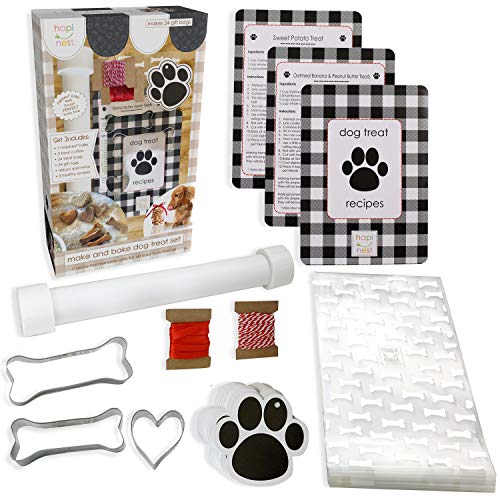
- Complete Dog Treat Making Kit: Includes dog cookie cutters for treats, heart-shaped cutter, dog treat biscuit roller, 24…
- Easy Homemade Dog Treat Recipes: Enjoy baking simple, healthy dog treats with our easy-to-follow recipes. Choose from Pe…
- Biscuit Roller & Dog Cookie Cutters For Perfect Treats: Use the included dog biscuit roller and dog cookie cutters to ev…
Why it’s cool: The mix is formulated with dog-friendly, all-natural ingredients (for example, whole wheat flour, oats, peanut powder, sweet potato powder, etc., depending on the flavor). Cooper’s Treats mix contains no preservatives or artificial junk – it’s one of the reasons pet owners like it. It’s also healthy and tasty; many mixes are designed by or reviewed by vets to ensure they’re nutritious. The starter kit format is great for beginners because it literally walks you through making your first batch with almost no chance of messing up. You just combine the mix with the specified wet ingredients, roll out, cut (with the included cutter), and bake. Fresh treats with zero hassle!
Why you’ll love it: Convenience and confidence. This kind of product is perfect if you’re not sure about baking from scratch or if you need a quick solution (maybe you’re out of certain ingredients). It saves time on shopping and measuring. Also, some kits come with multiple flavor mixes – for instance, a peanut butter flavor and a pumpkin flavor – so your dog gets variety.
It’s also fun for kids learning to bake because it’s so simple. Another plus: you know those nights when you realize you’re out of treats and the pet store is closed? Having a baking mix in your pantry means you can whip up a batch of biscuits in no time with what you have. Cooper’s Treats kit gets great reviews for taste (dogs devour the results) and for the cute packaging/presentation. All the joy of homemade with minimal work – yes, please!
Bonus: Airtight Dog Treat Storage Container
You’ve baked all these wonderful treats – now you need to store them. A good airtight dog treat container is highly recommended to keep your homemade goodies fresh. Look for a container or jar that has a tight sealing lid (such as one with a silicone gasket). A popular choice is an airtight stainless steel or ceramic treat jar that’s both functional and looks nice on the counter. For example, one Amazon’s Choice product is a white ceramic jar with a paw print design and a bamboo lid that has a rubber seal. It’s about 6-8 inches tall – perfect for a batch of biscuits.
Benefits: An airtight jar will keep moisture out, which is key to preventing your treats from getting moldy or stale too fast. It also helps contain the smell – some dog treats smell delicious to dogs but not as much to humans (looking at you, fish-based treats!). A dedicated jar is also a great cue for your dog; many pups recognize the sound of the treat jar opening and come running! Just be sure to keep it out of their reach – some clever canines have knocked jars off counters to get to the contents.
Why you’ll love it: It keeps your kitchen organized and your dog’s treats fresh. Many treat containers are stylish these days, so it doesn’t even look out of place with your kitchen decor. Also, if you bake different flavors of treats, you might get a couple of smaller jars and label them (e.g., “Pumpkin Bites” or “Training Treats”).
Remember, as we mentioned, most homemade treats last about a week or so at room temp, so only store what you’ll use in that time in the jar, and freeze the rest. This container will be your daily go-to for grabbing a treat or two for your pup, and a good one will keep those biscuits crunchy (or soft treats moist) until they’re all happily devoured.
Packing up homemade treats as gifts or storing them? Use airtight bags or containers. Tip: Include a label with ingredients if giving treats to friends’ dogs, in case their pups have allergies!
With these products on hand, you’ll find that making and storing homemade dog treats is easier and even more enjoyable. A cookbook sparks new ideas, molds and cutters make them look fun, a treat maker gadget saves time, a mix saves effort, and a storage jar keeps them fresh – it’s the perfect setup! All of the items listed have high ratings by pet parents and have been tried-and-tested in the real world. Depending on your needs, you might not need all of them but even adding one or two to your kitchen can level up your treat-making game.
Conclusion
Making homemade dog treats is a rewarding experience that benefits both you and your furry friend. You get the peace of mind of knowing exactly what’s in your dog’s snacks – no mystery ingredients, no unnecessary salt or sugar – and your dog gets delicious fresh treats made just for them. It’s a win-win! With a little practice, you might even start inventing your own recipes or tweak existing ones to perfectly suit your pup’s taste buds.
For getting more pet related products and ideas, please visit Pet Buddies Care.
Remember to always prioritize your dog’s health and safety: use dog-safe ingredients, control portions (those puppy eyes can be hard to resist, but stay strong!), and store treats properly so they stay fresh. It’s also a great idea to involve the whole family in the treat-making process – kids can help mix or cut out shapes, making it a fun activity that teaches responsibility and care for pets. Your dog will certainly appreciate the effort; don’t be surprised if they watch you in the kitchen with great interest from now on, hoping every batch is for them!
Finally, whether you use one of our recommended products like a cookbook or treat maker, or just a simple mixing bowl and your oven, the most important ingredient in any recipe is love. Cheesy as it sounds, the love and attention you put into making something for your dog will strengthen that special bond you share. Our canine companions give us so much happiness, it feels great to give them a healthy treat that gets their tail wagging. So go ahead – try making some homemade dog treats and watch your pup light up with joy. Happy baking, and here’s to many delicious, tail-wagging treat times ahead!